Quantcast
Channel: 10-8performance2
Viewing all 43 articles
Browse latest View live

Glock vs. M&P...or why I shoot an M&P

$
0
0


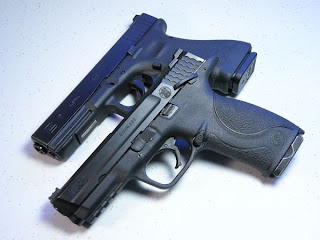
I'm coming in a bit late to the recent flurry of blog posts about this debate, but figured I'd weigh in with my own unique technical point of view.  Our friend Shelley at Gunnuts.net kicked this off with her take on the M&P vs. Glock, which was then followed up by a rebuttal on Vuurwapenblog, and finally by my good buddy Tim on his 10-8 Training blog.

Readers of this blog and the 10-8 Performance Facebook page are no strangers to my affection for the M&P.  I was one of the earliest adopters of the platform, and was hooked ever since I fired one of the prototypes in the basement of the S&W factory back in 2005 or so.  I have also been shooting Glocks since the 90's, and have a number of them in the pile as well, so I can speak with experience on both.  With so many compelling empirical arguments in favor of the Glock 17, why am I shooting a M&P 9mm?

For purposes of discussion below, I will be comparing the Glock 17 vs. the M&P 9mm full sized model.  If we were comparing the Glock 21 to the M&P 45, then let's just stop here and declare the M&P .45 the winner and move on.  Superior ergonomics by far, good accuracy, and availability of thumb safety to help transition 1911 shooters make the M&P 45 the clear winner in my opinion.  Add a viable and reliable factory 14 round magazine, and you pretty much have the whole package wrapped up with a bow.  Same with .40 - the M&P was designed for the .40, with steel chassis for increased rigidity and none of the  durability or function issues of the Glock 22.  Oddly, the 9mm was shoehorned into the M&P platform rather than the reverse which is true for Glock, and it is therefore the weakest model of the M&P.  So why do I shoot one all the time?

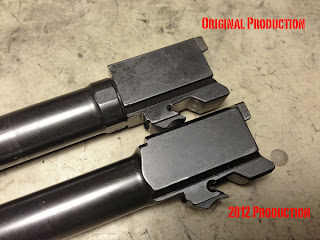
  • The main downfall of the M&P 9mm is the wildly varying accuracy thanks to some QC issues and design flaws.  The M&P 9 barrel uses a tragically slow 1:18.75" twist, which does a poor job stabilizing heavier bullets.  To add insult to injury, the M&P also unlocks extremely quickly.  This early unlocking tends to negate any conventional wisdom on what bullet weights should shoot well with the M&P, and you'll want to do a bit of experimenting.  The Glock is inherently more accurate than the M&P, and will shoot 3" or better at 25 yards with a wide range of ammunition.  I feel that 3" or less is a good measure for service pistol accuracy at 25 yards.  My 3 primary M&P 9mm's will all shoot 3" or better at 25 yards with any 147 grain ammunition that I feed them, and two of them have printed 2 5/8" standing offhand at 25 yards with 147 grain.  That works for me.  However, all three of the guns shoot about 6-8" at 25 yards using 115 and 124 grain ammo.  My solution at this point is just to stick with 147 grain.  
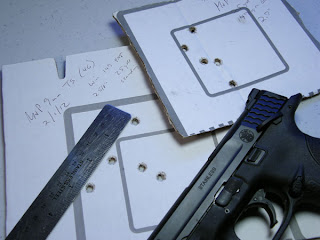
25 yd standing offhand groups with M&P 9
  • I feel that the M&P ergonomics are far superior for a 1911 guy, and better thought out overall than Glock (even the Gen 4).  The availability of interchangeable backstraps and thumb safety make the M&P a very logical polymer substitute for a 1911.  I love my M&P 9's light recoil and lack of maintenance and setup requirements, making it a great vacation from high maintenance/setup 1911s.
  • Reliability?  The 3rd Gen Glock 17 is an extremely reliable gun, but it's a real crapshoot right now with the Gen 4.  The M&P 9mm tends to be quite reliable across the board, and my 3 guns have not had any weapon related malfunctions in about 9000 rounds since the end of October 2011.  I have isolated some real bad primers in some of my ammo that have given me failures to fire, and had a total of 2 magazine related failures which were tracked down to a bad follower and worn spring in one mag.  That mag has been rebuilt and has since been 100%.
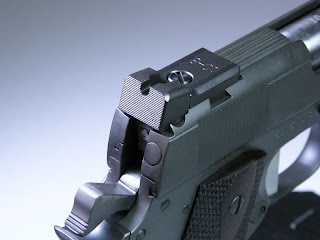
  • The factory Glock trigger is usable and consistent, which is one of its other strong points.  However, my Lyman digital trigger pull gauge tells me that the advertised standard 5.5 lb Glock trigger pull must not include a free bonus weight of anywhere from 1-3 pounds on various samples I have on hand.  Aftermarket parts may yield a lighter pull, but with an indistinct break that is still somewhat spongy.  My M&P's are mostly set up with the awesome Apex Tactical components, making for a true 4.0 lbs even on my digital gauge.  Stock M&P's often have a crunchy take-up due to stamping marks on the trigger bow, but tend to smooth up well with use.  The quality of the sear/striker engagement is typically pretty decent, and I have a couple guns that I shoot with the stock engagement (about 6-6.5 lbs) with no detriment in performance.  Even with aftermarket parts in both guns, the potential for an excellent trigger has the M&P far exceeding the Glock's potential.  The Glock trigger has a superior reset, but I feel that the value of a big clicky reset is overstated.  Remember that the break is what lets you shoot well, not the reset.  
  • I like the M&P's steel mags, they are easy to disassemble, and the current polymer finish on them is very good.  
  • The M&P is faster and more consistent to speed reload, with no ledges or cavities to catch the incoming magazine.
  • The grip angle issue is moot, I switch between my SIRT training pistol (which is basically a Glock 17) and M&P without even noticing.  I will even do this in live fire, alternating dry runs with the SIRT, then immediately running a live fire run with the M&P.  Whatever grip angle you prefer is the correct answer.
  • S&W customer service is exceptional.  

So that's why I shoot the M&P.  I am not blind to its faults, but I have figured out how to work around all of them, and really enjoy the platform.  With aftermarket enhancements, the M&P jumps ahead by leaps and bounds.  In time, I see the production M&P gaining even more ground on the Glock and getting the various weaknesses corrected.  With the M&P, I am also pleased to see an American made gun from an American manufacturer start to work its way into the holsters of American law enforcement.

Which gun do you prefer?  Let us know in the comments section.

USPSA Area 6 Championships

$
0
0


Just got back from the USPSA Area 6 Championship match at the Universal Shooting Academy in Frostproof, Florida. This awesome venue has grown and improved steadily over the years, and is now the host to a variety of tactical training courses, state/section matches, as well as the prestigious Steel Challenge and IDPA World Shoot. It has over 30 different bays on the expansive property, and is a great venue for hosting big matches. Universal Shooting Academy is also the home school of USPSA champions Frank Garcia and Manny Bragg. I have been to private training several times at this school, and highly recommend it if you wish to set up something for you or your group. The program can be fine tuned to work on any type of technical schools that you wish to train, and you will get individualized attention.

The Area 6 match was comprised of 12 stages, with 4 being standing speed shoots while the remaining 8 were elaborately built long courses involving a lot of neat props, walls, and movement. I love the long courses, as they present a fun challenge for each shooter to come up with their own strategy based on their individual skill level as well as pistol capability. All shooters regardless of skill and pistol division shoot the same courses. If you want to take a look at the stages, check them out HERE. Mom always said not to run around with scissors, but we all got to run around all weekend with guns instead!

I shot one of my S&W M&P 9mm full sized guns set up as follows:

  • 10-8 rear sight
  • 10-8 fiber optic front sight with red insert
  • 10-8 M&P aluminum base pads
  • Apex Tactical Hard Sear and Ultimate Striker Block kit, set to 4.0 lbs pull


This setup worked very well and provided me with a stress free training and match experience where I did not spend any time worrying if the gun was going to run.

My rig consisted of my usual daily wear Wilderness 5 Stitch Titanium Instructor Belt with holster and mag pouches from Blade Tech.

The match itself proved to be very challenging for shooters of all skill levels, as would be expected from a large area championship. I really enjoyed the run and gun stages, and those are pretty much what drew me back into USPSA after a rather long absence. This was my first area match since the 1992 Area 8 Championships, and it felt good to come back.

My match preparation, which unfortunately consisted only of about 5 range sessions, was not quite what I wanted, as there were some tough problems presented in some stages that I was not sufficiently prepared to solve. There were a lot of really tough targets - 15-20 yard no-shoot obscured targets and mini-poppers or plates were common, as well as some fast moving swingers. I had some solid stages, but also a bunch where all the above targets bit me hard. I ended up 24th overall in Production Division, 3rd A class (there were a lot of Master and Grand Master shooters in Production). I finished better than I thought, but not the way I wanted to. I already have a brutal training regimen planned to address my deficiencies from this match.

I was also pleased to spend the weekend shooting with Cliff Walsh from Top Shot Season 3 and Gabby Franco from Top Shot Season 4 (also a member of my home club). Both are wonderful people, and were lots of fun to have on the squad.

Special thanks to the following sponsors and industry friends who helped make my Area 6 experience successful:

Oakley - superior eyewear
Blade Tech Industries - Kydex holsters and mag pouches
The Wilderness - Titanium buckle instructor belt
Apex Tactical - M&P upgrade components
Atlanta Arms & Ammo - 9mm 147 grain JHP match ammunition
Next Level Training - SIRT dry fire training pistol


Check out the highlight reel and all the fun stages.


Do you shoot competition? Tell us your thoughts about competition shooting in the comments!


90 Degree Reload Drill

$
0
0

Here's a simple drill that you can do to really test your reloads.  Don't read too much into the tactical significance of this one, it's just a skill builder.  I started working this after reviewing video from Area 6 and finding that direction changes confounded my reloading process and slowed me down.  The setup pictured depicts two targets that are 90 degrees apart from your firing position.  Distance to the targets can be set based on your skill level.  I am working these on 15 yard targets for now, and mean to work toward more distant targets as well as closer ones at greater speed.

I started working this drill with my ever present and always handy SIRT pistol.  I had actually trained the drill in very informal dry practice for about a week prior to trying it live fire.  In dry practice, I'd just pick any two small spots on nearby walls/objects that were about 90 degrees apart.  I found that even this lightly structured practice without any set targetry proved to be very valuable, translating 100% into results in live fire.

Here's the drill:

  • Start facing one target, so that the other target is at your 3:00 or 9:00.  
  • Draw and fire 2 shots on the first target, then perform a reload as you pivot toward the other target and engage it on the move.  You may perform a slide lock or slide forward reload as your preferences and training needs dictate.
My primary objectives on this drill are:
  • Pivot aggressively to the second target during the reload.  This simple movement will be more confounding than you'd think, and you may find yourself sailing some reloads past the gun when you try to push the speed.
  • Complete the reload within the first step or two.
  • Engage the target on the move as early in the movement process as possible. 
The goal is to pare down the overall time for all 4 shots while completing the movements cleanly and aggressively.  For the tactical/defensive shooter, this will help get you out of being static for reloads.  For the competition shooter, this will shave off a lot of time during field courses.

2012 Single Stack Champion

$
0
0
Congratulations to Nils Jonasson, 2012 Single Stack National Champion!


10-8 Performance is very proud to sponsor Nils Jonasson, who blazed his way past an extremely tough field of competitors to become this year's USPSA Single Stack Champion.  Nils is only the third person in the history of the match to hold the championship title (Rob Leatham won the first 15, Dave Sevigny won 2011).  Nils used a single stack pistol built by Matt McLearn using parts from Caspian and 10-8 Performance.

Follow Nils on Facebook as he continues to burn up the 2012 USPSA matches!

Standardized Sight Dovetails

$
0
0
The most common emails that we get concern the compatibility of our sights with various sight dovetails.  I have seen internet forum posts from understandably frustrated shooters who wonder why manufacturers don't standardize the dovetails used.  To start answering this question for yourself, step outside and look at the car in your driveway.  Are all its parts made to the same dimensional standard as every other car driving down the road?  Sure, some parts share certain standardization,  but the majority of the components do not.  Even in relatively standardized parts like wiper blades, tires, and oil filters, there are still a mind boggling variety of options.  Firearms are no different.  A sight that is the correct shape and size for a Glock would be too short for a 1911, and sights appropriate for a 1911 could not be reasonably crammed onto a Glock.  Manufacturers design a gun, and the sights need to fit the form factor of the gun, not the other way around.  If we narrow this field a bit more just to 1911s, the gun has been in production for over 100 years, and nothing - not even the grip screws - is standardized.  It may be a bit confusing and inconvenient, but it's really no different than buying the correct sized tires for your car.

1911 Modular Rear Sight

$
0
0


We are very pleased to finally announce the release of our new 1911 Modular Rear Sight.  This new sight replaces adjustable rear sights with a unique 2 piece design that allows the sight to be installed in the pocket cuts popular in custom 1911s.  The design permits easy swapping of the removable, interchangeable sight leaf while the base remains in place on the pistol.  The user can easily swap out the sight leaf with only a flat head screwdriver or the rim of a .45 cartridge casing. The height of the rear sight blade approximates .325" "standard" height 1911 LoMount rear sights, and permits use of existing front sights. Once installed, this sight behaves as a fixed sight.

The sight is currently available with a Bomar base, which fits guns with true Bomar style adjustable rear sights, including the popular STI Trojan and Springfield Armory TRP Operator.  If you are not sure which base your pistol has, we suggest contacting the manufacturer. You can also check the photo gallery on the product page to compare the dovetail to your existing sight.

Sight Kit includes base, leaf, two set screws and wrench for base, custom pan head screw for sight leaf.

***Base for LPA Rear Sight coming later this year. LPA rear sights look similar to the Bomar, and are used on Springfield Trophy Match and Range Officer Models.  Comparison photos are on the product page.

Our Youtube channel has a detailed video that shows how the sight is installed, as well as how easy it is to swap the sight leaves.


10-8 Dry FIre Target

$
0
0


My good buddy Tim Lau (10-8 Consulting) and I have been working a lot with our Next Level Training SIRT dry fire pistols, and have seen substantial improvement in our skill sets.  One of the training tools that we have been using to augment our training is a scaled target.  The target you see pictured above is posted 4 yards from the shooter.  Each of the numbered circles represents an 8" plate at the scaled distance.  For instance, the circle with the big number "7"will look like an actual 8" plate at 7 yards when you are looking through your sights.  We have found a pretty solid correlation with drill sets performed with the SIRT on the scaled target and live fire on an 8" steel plate on the range.  For example, one shot draws using a par timer and the SIRT correspond almost directly to times for one shot draws on the range.

We'll be hitting some more drill sets with this target soon.  Stay tuned!

Defensive Pistol Instructor Collaboration, with Wilson Tactical Training

$
0
0

From Left: Rob Pincus, Chris Collins, Jeremy Wilson, Omari Broussard, Mike Hughes, Hilton Yam, Tim Lau

This past weekend I had the pleasure of traveling up to northern Washington to take part in an instructor symposium and collaboration sponsored by Wilson Tactical Training and Chris Collins (ATAP Training, Top Shot Season 3). The class brought together a number of instructors of varying backgrounds, and exposed students to a rich blend of instruction.


The instructors:

Jeremy Wilson, Wilson Tactical Training

Chris Collins, ATAP Training, Top Shot Season 3 contestant

Omari Broussard, 10X Defense

Mike Hughes, Next Level Training, Top Shot Season 3 contestant

Tim Lau, 10-8 Consulting

Rob Pincus, I.C.E. Training and Personal Defense Network

Hilton Yam, 10-8 Performance


It was truly great to work with these instructors and spend time with them both on and off the range. This industry is driven by the people in it, and it is always great to build new friendships and exchange ideas with like minded individuals. Even though the instructors each had their own approach to firearms training, much was learned in the discussions, and ultimately we all had the same goal to pass on the best possible training to the students.

Stay tuned for more information about this project.

1911 User's Guide

$
0
0

If you use a 1911 as your primary handgun, you hopefully have figured out that it is practically a lifestyle choice, and requires commitment on your part to set the gun up and keep it running.  Students at the 10-8 1911 Classes get to run through the detailed disassembly and reassembly of the gun during the first day of the course.  My User's Guide has long been a resource for this process, and has just now been updated with all new pictures to help the home student.  There are many different ways to disassemble and reassemble the 1911.  Please keep in mind this is just one way that I have settled on over the years of doing this and teaching it to others.

SIRT Drills: Simple Maintenance Set

$
0
0
One of the great advantages of the Next Level Training SIRT pistol is that it takes zero setup to get in some quality reps.  Here is a simple drill set I use almost every time I pick up my SIRT.

1) 10 reps, freestyle (2 handed)
2) 10 reps, strong hand only
3) 10 reps, support hand only
4) 10 reps, freestyle support side (2 handed, using support hand as the primary gripping hand.  i.e. mirror image from your normal stance)

This simple drill set takes all of a minute or so, and as long as you are concentrating on the quality of the trigger presses, it's another minute of quality training under your belt.  Feel free to make up bad shots.  I like to do this drill set after PT, as my hands may be smoked from holding weights or I may be shaky from hard cardio, and it makes fine trigger control a bit harder.  I have one of my SIRTs set up with a heavy 8-9 lb pull to maximize the benefit of low volume training.  You can use any target you like, whether it is a light switch or something more regimented like our 10-8 Dry Fire Target.  Train hard and train smart!

10-8 1911 Classes: PA AAR, LA Class Coming Soon

$
0
0

Well, better late than never... The 10-8 1911 Class in southeastern PA wrapped up a few weekends ago, and it was a great success. The students worked hard for 2 days at the Guthsville Range in Orefield PA, and the weather cooperated nicely for us to get a lot of work done. As usual, Day 1 consisted of a classroom session to go over the mechanical function of the 1911 and tear down the guns. Students got multiple reps of disassembling their 1911 down to the individual components.

By the end of Day 1, here's the running tally on student guns that were repaired. Of the 19 student guns:
  • 13 had extractor tension or geometry that needed correction 
  • 2 had loose plunger tubes 
  • 2 had a mag catch that trapped mags 
  • 1 had a grip screw bushing come out with the grip screw 
  • 1 had to have the hammer strut pin staked 
On Day 2 we hit the range for function testing, and inevitably that yields more fixes.  Keep in mind that the function testing pushes the guns to their very limits, and guns that "worked just fine" prior to the course had flaws - either minor or major - that were exposed.  It is analogous to driving down the road with a car that makes a few weird noises or emits some extra smoke.  Sure, it gets you there and maybe it keeps on going, but something definitely is wrong and you can't just turn up the radio and call it good.


After our 10-8 Test Fire Protocol, we ended up with a few additional guns that needed work for the following:
  • 5 of the 13 guns from Day 1 required additional attention for their extractors. Of these guns, three of them required multiple trips back to my workbench and ultimately needed replacement of their extractors in order to work optimally. 
  • 2 guns had hammer follow 
  • 2 guns had false lockback issues 
  • 1 gun had feedway issues 
All students left the class with guns that were functioning at optimum levels. After the above function work was squared away, students were taken through a series of instructional blocks which covered manipulations and operations specific to the 1911. While our course is not specifically intended as a shooting course, students got plenty of range time to get them spooled up on their 1911s.

Just as an item of interest - extractor function is not guaranteed just from the bench inspection and adjustments. It is necessary to run the function test before we declare a gun 100%. I have fit quite a few extractors over the years (I've done well over 100 just within the last 8 months), and I still will not cut a gun loose for service without the function test. If you think setting up a 1911 extractor is "easy," then you are definitely missing a lot of the setup. Students at our classes gain a solid appreciation of this.

If you are serious about running the 1911, you’ll enjoy the 10-8 1911 class and learn a lot. Bring a good gun, an open mind, and your notebook!

Upcoming classes for 2012 are listed on the 10-8 Performance Training page. The next class is 07/28-9 in Newhall, CA. Please note that our complete schedule for 2012 is posted, and no other classes will be added. Our schedule for 2013 is not yet posted, but will be a bit less ambitious than this year (all the instructors are full time LEO’s and cram these classes in between other commitments). If you are interested in attending a class, please don’t wait for it to come to your front door, please consider traveling to see us. None of our students have been disappointed in the experience, and we don’t think you will be either! See you at the range!

S&W M&P Barrels, An Informal Test

$
0
0


The S&W M&P 9mm full sized pistol has had a spotty record in terms of accuracy. The factory barrels have had issues with premature unlocking, sloppy lockup, and a twist rate that is not optimized for 9mm ammunition. In using the guns over the years, I have figured out some work arounds, but the recent advent of production revisions and aftermarket match barrels has caused me to take a harder look at the issue.

The informal testing has been based around my using a few different M&P’s for training and competition since fall 2011. The guns in question are 4 M&P full size 9mm thumb safety models, and all run 10-8 sights and base pads and Apex hard sears and striker blocks. Deviations from this setup are noted below.
  1. Primary USPSA gun, circa 2006-7 production. With KKM match barrel. 
  2. Secondary USPSA gun, circa 2011 production. With stock barrel. 
  3. Boresight Solutions 10-8 Performance package gun, circa 2006-7 production. With Storm Lake match barrel and Apex AEK trigger prototype. 
  4. Stock gun with no mods, 2012 production. 

Before we proceed, I’d like to again caveat that this information was gathered over many months, in an informal manner, and was never meant to be a big scientific test.


All the available barrels were examined for twist rate and lockup. The lockup was measured by inserting a feeler gauge between the breech face and barrel hood. Here’s what I have gleaned about the different barrel configurations:

Barrel
Twist Rate
Hood to Breech Face Gap
Pistol #1: Original production barrel
1:18.75”
*Manufacturer provided spec
.012”
Pistol #1: KKM Match barrel
1:24”
*Manufacturer provided spec
.002”
Pistol #3: Original production barrel
1:18.75”
*Manufacturer provided spec
.009”
Pistol #3: Storm Lake Match barrel
1:16”
*Manufacturer provided spec
.008”
Pistol #4: New production barrel
estimated visually at 1:24 (looks equivalent to KKM)
.003”


Without boring you with a massive table detailing the accuracy of each load in each gun/barrel combo, here’s the summary. **All groups are reported at 25 yards, standing off hand.**
  • Original Production Barrels with 1:18.75” twist: These barrels tend to shoot about 3” or better with 147gr ammunition. They do not shoot very well with 115gr and 124gr ammunition, and groups larger than 8” at 25 yards were common. 
  • KKM Barrel: Despite the inexplicably slow twist, this drop in barrel is a performer in all bullet weights. I have only done limited accuracy testing with it so far (consisting of shooting 1 group for each bullet weight, standing off hand), but it shot 3” or better with each load, and 115gr Atlanta Arms match ammo shot around 2”. The improvement in accuracy has been apparent during regular training at 15 and 25 yards.
  • Storm Lake Barrel: This drop in barrel basically fits exactly the same as the original production barrels, but with the more commonly accepted 1:16 twist rate. What this has translated into is that this barrel delivers about 3” or better accuracy with all ammunition types instead of being limited to one bullet weight. 
  • New Production Factory Barrel: As best as I can determine, this new style barrel started being phased in earlier this year. It removes the various stress risers ahead of the chamber area, tightens lockup, and brings in a new twist rate. I was not able to get an official answer from any of my points of contact at S&W, but visual comparison of all the barrels has determined that the new barrel has a slower twist rate than the original production units, and more closely resembles the 1:24 twist of the KKM. This new barrel fits almost as tightly as the KKM match barrel. It also delivers performance - it shot a 2.5” 10 shot group at 25 yards off a rest using Atlanta Arms 115gr match ammo. It shot a 3” group with 147gr ammo, also off a rest. 


Shooting groups is tedious to me, so most of the accuracy information reported above is pretty much from one cold group on a given day. Accuracy trends have also been noticed during my regular training regimen, which includes 15 and 25 yard accuracy drills. At some point I may do more stringent testing, but suffice to say that it is reasonable to allow that all the barrels will group better if shot off a rest for 3-5 round groups under more idealized conditions.

More match barrels are pending release from various vendors, and I intend to check them out when they become available. For now, the KKM seems to be the leader for aftermarket barrels, and the new 2012 production barrels seem to have solved the previous issues from the older guns.

The "India" 1911 Build

$
0
0


The latest pistol off my bench is a very interesting amalgam of my past and present. India is the ninth build in my current alphaphonetic call sign series. You can read about the others in the series on the 1911 Page of the website.  This pistol started with a Chip McCormick Corporation (CMC) frame that I had languishing in the safe from another project. Back around 2000-2002 or so, CMC sold slide and frame kits. The frames were awesome, and made great platforms for builds. They unfortunately were discontinued after only a couple years of production. I had squirreled away a few of them, and this one had originally been filled out with some spare parts to run a Kimber Series II external extractor slide. Needless to say, that experiment was short and ended in rather miserable failure. The frame then sat unused and partially completed in my safe before I pulled it out last year for setting up a .22 conversion kit training gun. I topped the frame with a Marvel Unit 2 conversion kit and completed the work on the frame to create a near duplicate to my Echo 1911. The Marvel kit failed to meet my expectations for reliability and accuracy, and ended up being put aside. After I recently sold Echo, I dug out the frame, updated it yet again, and topped it off with a .45 caliber top end.


Here’s the build list:

  • CMC forged chrome moly frame, circa 2001, checkered 20lpi. 
  • CMC thumb safety and disconnector, also circa 2001, now discontinued. These were good parts and I wish I still had more of them. 
  • CMC grip safety and bobbed spur hammer. These were installed and blended a number of years ago, and are remnants of an older period of my work. This was one of the very early setups where I started with what is now the standard look on 10-8 builds. Note that the grip safety is blended in the “out” position, something I moved away from. This manner of blending leaves minor mismatches when the grip safety is depressed in the firing position, and can abrade the hand during extended firing sessions. 
  • 10-8 mag well. This mag well setup replaces the bottom of the frame and mainspring housing, and is attached via a proprietary CNC interface that is used under license from Briley and Pistol Dynamics. It is only available on 10-8 builds, and India is currently one of only four pistols to have this feature. 
  • 10-8 flat trigger, mag catch, grip screws, Gen 2 slide stop, spring plug, .140” U notch Low Mount rear sight and .100” wide fiber optic front sight. These are all current production components, many left over on the bench from other current projects, and replaced some of the older parts left on the gun. 
  • 10-8 scoop grips, 5lpi checkered, Ghost G10. The Ghost color is really cool, but are unfortunately discontinued as the material is no longer available in this color. 
  • 10-8 “Echo Series” slide. The slide serrations on this gun are the ones debuted on the Echo build, and feature a wider pattern that is abbreviated at the bottom on the rear set of serrations. This feature keeps the serrations from abrading the shooter’s thumb during extended firing. Proper 1911 firing technique dictates that your shooting thumb rides the thumb safety, which puts it next to the slide serrations, potentially causing irritation during long range sessions. 
  • 10-8 stainless barrel. One of the early 10-8 marked match barrels. Production versions are now available
  • Aftec extractor. This gun uses an Aftec extractor, which is a rigid unit that is powered with two small coil springs retained with a small cover. The Aftec dropped right in, and is paired with a scrap firing pin stop from my parts box. The advantages of the Aftec include a very simple install that is typically a drop in process, constant tension provided by coil springs rather than bending the extractor, and no requirement for a fitted firing pin stop. With the Aftec, the firing pin stop just holds in all the parts, and unlike a traditional extractor where function is optimized by fitting to prevent extractor rotation and play, the Aftec actually needs to move freely on the firing pin stop to pivot correctly. The downside is that it has the two springs and a cover, which make it harder to install and leaves you with small parts to lose. We’ll examine the merits of the Aftec after India gets some rounds downrange. 
  • Checkered trigger guard.  The underside of the trigger guard has been hand checkered at 50lpi.  I had a gun back in the 90's that had 50lpi checkering under the trigger guard, and had always liked it.  For some reason, any gun that I've checkered to date has used 40lpi under the trigger guard, and it was just a little more than I needed.  This is the first gun that I did in 50lpi, and it provides just enough traction without eating the side of my finger.
So there you go, a pile of spare parts spanning over 10 years of work, finally turned into a complete build!

Pro Am Prep, Session 1: Selecting the Gun

$
0
0
It's getting that time of year again, time for the Pro Am Championship steel match at the Universal Shooting Academy in Frostproof Florida.  Check out the crazy fun stages HERE.  I had a great time at this match last year, and despite shooting it with a .45 and Major Power Factor loads in extended 10 round mags, still placed high enough to win a gun.  Check out last year's video below.


This year I thought I'd do it a little smarter and actually run a lower recoiling gun that was set up for this match.  I knew I wanted to run a 9mm, and was split between running my primary M&P 9mm with KKM barrel or my newly refurbished M&P 9L.


The 9L has a 5" barrel, 1" longer than the standard full sized gun.  The longer sight radius is theoretically advantageous in practical accuracy as well as visual tracking of the sights in movement between targets and shot to shot recovery.  I'd had this 9L for a number of years, and recently sent it back to the factory for refurbishing when the accuracy degraded.  It returned with a new slide and new style production barrel, and boy does it shoot!  The 2" group below was shot at 25 yards with Atlanta Arms 115gr JHP blue box remanufactured ammunition.


After running a number of drills at different distances with both guns, here's what I determined based on my own skill level and shooting style:

  • The 9L's front sight seemed to move slower in recoil, and seemed to recover from recoil more slowly based ONLY on the perceived sight movement.  Drill times were the same at 7-15 yards.
  • The full size gun's front sight moved more sharply in recoil, and seemed to return from recoil more quickly.  This was more apparent during Bill Drills (Draw & fire 6 A zone hits) at 7 yards than it was during multiple target transition drills.
  • Swinging from target to target was the same with either pistol.
  • Running Bill Drills at 25 yards was where the difference became readily apparent between the two guns.  I was able to consistently shoot sub 4.5 second Bill Drills clean with the 9L, where the full size gun was 4.6 seconds or higher.  This difference is minor, but the perceived effort in shooting these drills was less with the longer slide and sight radius.
After the smoke cleared, I didn't find a significant enough difference from 7-15 yards between the two guns to deviate from my tried and true full sized gun.  The 9L was a great shooter for sure, but the rest of the training cycle for Pro Am will be done with the same 9mm full size gun that got me through the Area 6 match and the IDPA classifiers from earlier this season.


Pro Am Prep, Session 2: The Backup Gun

$
0
0
M&P 9mm full size, various production dates
L-R: 2012 stock gun, 2011 backup gun, 2007 primary gun
With the selection of the primary gun out of the way, the next important step was to make sure that my selection of backup gun was appropriate for the 115gr JHP Atlanta Arms match ammo that I will be using for the match.  My primary gun has a KKM match barrel, so it shoots a little different than the factory barrels that most of my other guns wear.  The Pro Am is a very accuracy oriented match, with plenty of small steel targets, and I wanted to be sure that both guns shot to the same point of impact.

Any time I travel to a shooting event, whether it be a big match or a training class, I always make sure to bring an entire spare gun.  You can pack all the spare parts you want, but in the end it is faster to just switch out the gun.  It is not hard to think of situations where things will go wrong that will either require more tools and parts than you have, or be so difficult to fix that you wouldn't want to attempt it on a rickety bench at the range.

My primary match gun is pictured above at the right, and has a 10-8 fiber optic front sight, 10-8 rear sight, and Apex Tactical sear and striker block.  All my mags use the 10-8 machined aluminum base pads.  It's very easy to set up the M&P, and my existing backup gun (above, center) is nearly indistinguishable from the primary gun except that it has a stock barrel.

Heading out to the range, I also brought a new production 2012 gun to see how it grouped in comparison to the 2011 production backup gun.  Again a caveat to my accuracy testing to date: I am really impatient and basically shoot one group at 25 yards and call it good enough.  More testing would likely yield better data and smaller groups, but I have training to do...  With that out of the way, the primary gun with the match barrel averages just around 2" with the 115gr match, while both guns with the stock barrels shoot right around 3".  The existing backup gun shot to the same point of impact with the 115gr as the primary gun, so I was happy to call it good.  I ran a few drill sets with the backup gun and called it a day.

Now it'll be time to hit the drill sets pretty hard!

Pro Am 2012, the aftermath

$
0
0

The Pro Am Steel Championship is over, and it was a really great match this year!  The stages required more strategy than last year, and it made for some very interesting planning to figure out how to get the highest score for a particular stage based on your skill level and the available targets.  Everyone on the 10-8 squad enjoyed the format very much, and we're already thinking about how to approach the match for next year.

I was a bit disappointed in my overall performance at the match this year, despite what I felt was sufficient preparation and an appropriate pistol.  My placement was comparable to last year's match -  44th out of 200 Limited shooters (78th percentile), whereas last year shooting a .45 I was 29th out of 145 (80th percentile).  The match clearly is very accuracy oriented, and any gains from reduced recoil are minimized by the overall difficulty of targets.  In looking at my match performance, I failed to really buckle down on the sights, accepting entirely too much sighting error during the first half of the match.  Once I settled in and saw enough sight picture for each type of target, things went a lot better.  The above stage was shot second to last, and was what I was pulling off once I got my head on straight.  Next year I will drastically reduce the prep on close hosing target arrays and really work 15-25 yard targets and wide target transitions.

The Pro Am is well supported by industry sponsors, and the top 5 shooters in each class won a gun.  Our squad did well overall, and Joe H. with a 11th overall finish, Ian G. with a 31st overall, and myself with a 44th overall all ended up winning a gun.  Go team!

More video and follow ups are forthcoming, but I wanted to get a few initial thoughts out as well as this video.

SIRT Circuit

$
0
0

Felt a bit uninspired with PT today, so I came up with a new circuit.

SIRT Circuit

3 Rounds for time:
100 rope jumps
20 box jumps, 24" box
20 kettlebell swings, flip & catch, 30lbs
20 wall ball shots, 10' target, 20lb ball

20 1 handed kettlebell swings, twist & pass to other hand, 20lbs
10 shots on 1" circle @ 4 yards with SIRT, 2 hands
10 shots on 1" circle @ 4 yards with SIRT, strong hand only
10 shots on 1" circle @ 4 yards with SIRT, support hand only

Any misses or bad shots with SIRT (like a jerk and hold where the laser traces a long squiggle rather than a blip) must be made up. This got a bit harder by the third round.

Post your times to the comments!

Must Have Mods For Your 1911

$
0
0


Much is said about the old 1911 adage, "everything you need and nothing you don't", or words to that effect. It is generally held that your basic 1911 mods must include reliability, sights you can see, and a good clean breaking trigger. I will certainly not tell you anything different, but we can take a little bit closer look at the basic mods and some other easy fixes that will make your 1911 a better tool. Keep in mind that this article is not a "how to" guide, but rather a resource to allow you to better communicate with your gunsmith and to be a smarter end user.


Reliability:
The 1911's main areas of weakness are the feedway and extractor. To do its job properly, the extractor needs to have correct claw geometry and proper tension. Toward this end, the extractor must also be consistently located in the slide, which is a product of the fit of the firing pin stop. A loose firing pin stop will allow the extractor to rotate or "clock" and not get a consistent grip on the case rim. A good 1911 smith can assess your factory firing pin stop and extractor, and either adjust or replace as needed.

The 1911 is also famous for feedway stoppages, and care needs to be taken to get this area properly set up. The chamber of the barrel should be reamed to SAAMI specifications, with a proper leade (the transition from the chamber to the rifling) cut and the interior surface as smooth as possible. The mouth of the chamber should be cut to allow feeding of hollow point ammunition. Unless you are rebuilding an old Colt, all the modern 1911 barrels are already cut this way, and it is not an area that typically needs much attention beyond some polishing and edge breaking. The feed ramp should be polished and cut to the proper dimensions. Many factory feed ramp jobs are cut too shallow as measured from top to bottom, and others are rough or covered with the paint finish that is on the rest of the gun. Contrary to popular belief, it is not critical to have the feed ramp and barrel throat mirror polished. Smooth with the proper geometry is the key.

There are a number of other areas that should be smoothed out, polished, or clearance cut to promote better functioning. Each smith will have a different approach, and each gun may need something different depending on how well they did their work at the factory.


Trigger:
A clean breaking trigger of 4-5.5 pounds is well suited for duty or defensive work. Many factory 1911s now come with long aluminum triggers with overtravel stops and decent trigger jobs, so you may not need much here. A trigger job can be performed on the factory components, but many of the MIM factory hammers and sears do not hold a trigger job as long as machined bar stock components. If you spend the money on a trigger job, you may as well upgrade the hammer and sear to better preserve your investment.


Sights:
After reliability and a clean trigger, the next most important part of the shooter experience is the sighting system. You have to look at the sights every time you shoot the gun (that’s the idea, anyway...), and lousy sights will ruin your day. Most modern 1911s have dovetail cuts in the slide, which make it easy to drift out and replace the factory sights. You should try various sighting systems before purchasing one, to ensure that you know what you want.


Other items:
Some other easy changes to improve your 1911 experience are grips and the mainspring housing. These two parts, both easily switched out by the end user, can do much to fit your 1911 to your hand. The other area that I typically address up front is dehorning of certain critical components. The gun is no fun to shoot if it cuts you every time you touch it. A stainless gun makes this process easy, but a carbon steel gun would need refinishing. Since we are just doing the bare bones basics, I would limit this initial dehorning effort to small parts like the safety and slide stop, which are easily refinished.

The 1911 has a few more screws and pins than modern designs, and it is helpful to ensure that critical items are secured when setting up a new gun. Every screw on the 1911 needs to be secured with Loctite or else you will end up chasing them at the most inopportune time. Blue Loctite 242 is recommended for the grip screws and sight set screws. Green Loctite 290, a thin wicking compound with similar shear strength to 242, is recommended for securing the grip screw bushings, front sight and roll pin (if present), and the plunger tube.


You can do a lot of good work with basic setup such as the pictured pistol, without having to get really carried away with modifications.

Trijicon RMR equipped M&P

$
0
0

I just started a new project to evaluate the mini red dot optics on a service pistol.  It's been 22 years since Jerry Barnhart won the USPSA Nationals with a 1911 equipped with a Tasco PDP2 red dot, and the technology is finally starting to mature enough to where it is viable to use on service pistols.  Red dots are considered standard on carbines, and their place on pistols is clearly going to grow.

My pistol, my favorite plastic platform - a S&W M&P 9mm with a thumb safety - is set up as follows:

  • Apex Tactical Specialties machined sear and Ultimate Striker Block kit.
  • Trijicon RMR07 - 6.5 MOA dot, manually adjustable, battery powered (CR2032)
  • Slide machined for RMR, top serrations, refinished in black Melonite by ATEi 
You can see a full album of the awesome machine work and the pistol setup on our Facebook page.

I ran the gun at the USPSA match this past weekend, after only one range session with the gun, and had great results.  


Despite being placed in Open division along with compensated .38 Supers and having to score Minor, I scored along with the A class Open shooters in the club, and was able to shoot a 73.49% classifier score (75% is the cutoff for A class).  With so little time on the gun, I was very encouraged at the potential.  My new goal is to try to get classified A class in Open division, with a plastic service pistol in 9mm.  Stay tuned for more updates here and on our Facebook page!


Colt Rail Gun

$
0
0
As it came from Hartford...

One of my other new projects is this Colt Rail Gun.  The pistol is pictured above in its stock configuration, exactly as it came out of the box.  Initial impressions were quite positive.  The first thing I noticed was that the guns are not as sharp as they used to be - the newer guns have more dehorn going on than the original production runs.  Overall build quality was quite high, with good slide/frame fit and solid barrel lockup.  I noted that the barrel hood made some contact with the breech face, which is some bit tighter than Colts of years past.  Colt's small parts are of the highest quality of a mass production 1911, with many small parts consisting of forgings or bar stock.  The only MIM components are typically the sear and disconnector, though they are both of good quality and very serviceable.

The two main gripes on the gun are the fit of the ambi safety and the trigger pull.  The safety's sear stop stud was not fitted enough, and it was a bit difficult to place the gun on safe.  The safety did not click on and off.  The trigger had a lot of creep and a spongy break.

Having done this once or twice before, I knew there were a few things that I would want to change prior to hitting the range:

  • The rear sight was changed out for one of my 1911 Low Mount Rear Sights
  • The grips were changed out for some 10-8 5 lpi grips in Dirty Olive, held in place with 10-8 GI grip screws
  • The safety was given a few swipes with a file to clean up the fit to the sear.  It wasn't 100%, but it would be a little easier to work.  The rear corner of the safety was also very square, and this was recontoured on the belt sander.
Attaching a Surefire X400 rounded out the package.  You'll be seeing more of this gun in the next month or two as it gets evaluated for a new build package.  Stay tuned here and on our Facebook page for updates.

Ready to hit the range.


Viewing all 43 articles
Browse latest View live